
by Eric Woersching
Introduction
WordPress is a blog publishing application and content management system. According to wordpress.org,WordPress is “a state-of-the-art semantic personal publishing platform with a focus on aesthetics, Web standards, and usability.” The following sections describe how to install and configure WordPress for use with FastCGI on Internet Information Services 7 (IIS 7) and above. This document assumes that you have completed the setup and configuration of the FastCGI extension and PHP libraries.
The easiest way to install WordPress is by downloading it from the Windows® Web App Gallery. If you need the Microsoft® Web Platform, you can install the components with the Microsoft® Web Platform Installer (Web PI), which is also available at the Windows Web App Gallery.
The following article provides guidance for installing WordPress manually. The instructions have been tested and found to work in the following configurations:
- Windows Server® 2008 operating system
- IIS 7
- PHP 5.2.9
- MySQL 5.1.34
- WordPress 2.8.5
Prerequisites
From the base default configuration file provided by PHP, modify the following lines in your Php.ini configuration:
- Define
extension\_dirasc:\php\ext(for example, the location of your php extensions directory). - Uncomment
extension=php\_mysql.dllin the extensions list to enable MySQL support.
Modify Php.ini
- cgi.force_redirect = 0
- fastcgi.impersonate = 1
- ============== remove the ; comment
- extension=curl
- extension=mysqli
Download and Unpack the Application
First, download the latest stable release of WordPress. For this article, WordPress version 2.8.5 was used. Uncompress the WordPress files and copy the files to C:\Inetpub\wwwroot\wordpress or another directory of your choosing. There is no need to modify permissions on the WordPress Web directory, because the default permissions suffice.
Set Up the Database
Before starting the installation procedure for WordPress, you must create a database on your server. Also create a user and grant this user “db ownership” permission to the database. This article uses the following database information:
- Database name: wordpress
- Database user: wordpress
- Account password: wordpress
Modify the Configuration File
Modify the WordPress configuration file to connect to the database.
- From Windows® Explorer, navigate to the installation directory
C:\inetpub\wwwroot\wordpress, and rename the file wp-config-sample.php to wp-config.php. - Edit wp-config.php; change the DB_NAME, DB_USER, DB_PASSWORD, and DB_HOST values as follows:
<?php
// ** MySQL settings ** //
define('DB_NAME', 'wordpress');    // The name of the database
define('DB_USER', 'wordpress');     // Your MySQL username
define('DB_PASSWORD', 'wordpress'); // ...and password
define('DB_HOST', '192.168.0.4');    // Change this to the IP address of your database
define('DB_CHARSET', 'utf8');
define('DB_COLLATE', '');

// You can have multiple installations in one database if you give each a unique prefix
$table_prefix  = 'wp_';   // Use only numbers, letters, and underscores.

// Change this to localize WordPress.  A corresponding MO file for the
// chosen language must be installed to wp-content/languages.
// For example, install de.mo to wp-content/languages and set WPLANG to 'de'
// to enable German language support.
define ('WPLANG', '');

/* That is all, stop editing. */

define('ABSPATH', dirname(__FILE__).'/');
require_once(ABSPATH.'wp-settings.php');
?>
Setup and Configure the Application
- From Windows® Internet Explorer®, go to
http://localhost/wordpress/wp-admin/install.php. - Type the name of your blog and your e-mail address, and then click Install WordPress.

Figure 1: Enter information
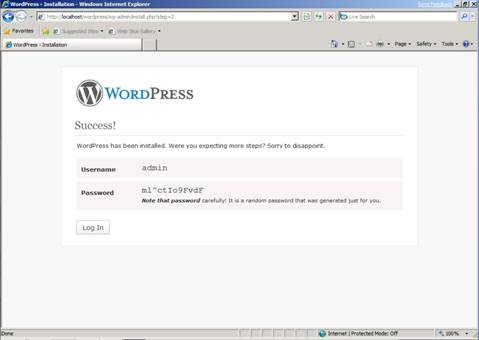
- Note the temporary password assigned for the administrator account.
Figure 2: Note the administrator password
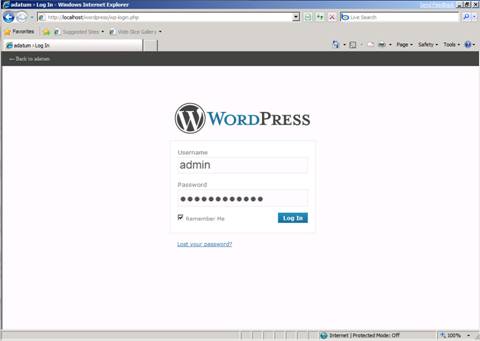
- Begin managing your blog from
http://localhost/wordpress/wp-login.php.
Figure 3: Log on to blog
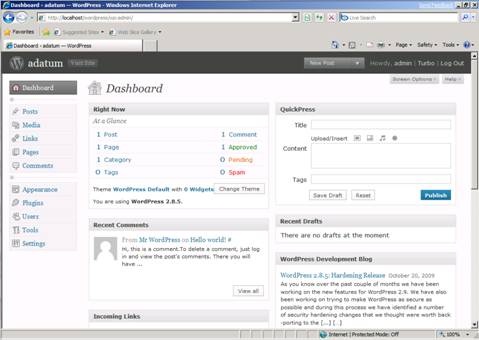
- The Welcome page appears.
Figure 4: Welcome page

Enable “Pretty Permalinks”
Typically, WordPress users must use “almost pretty” URLs (for example, http://contoso.com/index.php/yyyy/mm/dd/post-name/). With the URL Rewrite module, you can create “Pretty Permalinks” (for example, http://example.com/year/month/day/post-name/) for WordPress blogs hosted on IIS.
The steps that follow assume that WordPress is installed in a Web site root directory. If WordPress is installed in a subdirectory, then the rewrite rules must be included in the Web.config file located within the same subdirectory as the WordPress files.
- Install URL Rewrite Go Live release.
- Log on to WordPress as an administrator.
- Click the Settings button.
- Click the Permalinks tab for the Customize Permalink Structure page.
Figure 5: Customize permalink structure page
- Select Custom Structure, and then type
/%year%/%monthnum%/%day%/%postname%/ in the Custom Structure text box. - Click Save Changes. You will see that all the blog post links have URLs that follow the format you have specified; however, if you click any link, the Web server returns a 404 – File Not Found error, because WordPress relies on a URL rewriting capability within a server to rewrite requests that have “pretty permalinks” to an Index.php file.

Create Rewrite Rule
- Open the Web.config file (located in the same directory as the WordPress files). If you do not have a Web.config file in the WordPress directory, create it.
- Copy and paste the following XML section into the system.webServer element:
XML
-
<rewrite>
    <rules>
        <rule name="Main Rule" stopProcessing="true">
            <match url=".*" />
            <conditions logicalGrouping="MatchAll">
                <add input="{REQUEST_FILENAME}" matchType="IsFile" negate="true" />
                <add input="{REQUEST_FILENAME}" matchType="IsDirectory" negate="true" />
            </conditions>
            <action type="Rewrite" url="index.php" />
        </rule>
    </rules>
</rewrite>
This rule matches any requested URL; if the URL does not correspond to a file or a folder on a file system, then the rule rewrites the URL to Index.php and determines which content to serve based on the REQUEST_URI server variable that contains the original URL before it was modified by the rule.
Test the Rewrite Rule
After the rewrite rule is saved to the Web.config file, open a Web browser, and then click any one of the permalinks in WordPress blog. You should see the correct content returned by the Web server for every permalink.

Figure 6: Blog welcome page
Note
This article updates ” WordPress on IIS” by Eric Woersching, published on September 11, 2008.