
In this post, we go over 10+ ways to speed up your WordPress site and improve Elementor page speed.

There’s nothing worse than a website that takes forever to load, right?
If you’re like most Internet users, it annoys you to no end and might even push you to hit the “back” button before the site’s content even loads (especially on mobile!).
Moreover, you definitely don’t want your WordPress site to be the one that loads slowly.
Beyond just plain making for a better user experience, speeding up your WordPress site might also boost your conversion rate. And Google has used page speed as a ranking factor in its desktop search results since 2010, with plans to use it in mobile search results starting in July 2018.
Taking these considerations into account, we’ve always focused on optimizing performance with Elementor. But Elementor is just one tool. If you want to truly speed up WordPress and make your site load as quickly as possible, you need to take a broader approach.
In this post, we’re going to share exactly how to speed up your WordPress site. While some of these tips reference how to speed up the sites that you build with Elementor, all of these tips still apply to other types of WordPress sites.
7 Major Performance Optimizations To Get You Started
There are a whole bunch of minor performance tweaks that you can make (that’s the next section!). But these seven optimization tips are going to offer the biggest bang for your buck when it comes to speeding up your WordPress site.
For a fun twist, test your site with Pingdom Tools or Gtmetrix before you get started. That way, you can know exactly how much these tips speed up your WordPress site.
1. Choose A Performance-Optimized Host For Your WordPress site
All the other tweaks on this list will be about actually fine-tuning your existing site.
But despite all those tweaks, you can’t get around this fact:
Your site will still only be as fast as the engine that powers it. You can make your site faster with the following tips, but you can’t make it the fastest without quality hosting working underneath.
So what makes performance-oriented hosting?
First off, you definitely want a host that offers PHP 7+. PHP 7 offers massive performance improvements over the older versions of PHP 5 that many hosts are still running.
A quality managed WordPress host should offer PHP 7, as well a bunch of other performance tweaks to help your WordPress site load fast like server-level caching and more.
On the budget end, SiteGround and InMotion Hosting offer quick-loading managed WordPress plans. And as your site grows, Kinsta and WP Engine all offer quality solutions.
Any of the hosting companies above should be able to run Elementor, but if you go with another option, here are the specs that you should look for to maximize Elementor’s performance:
- PHP 7+
- MySQL 5.6+
- Minimum 64MB WordPress memory. Ideally 128MB+
2. Improve Page Speed With a Lightweight WordPress Theme
Even if you’re using a page builder to create most of your content, your theme is still going to play a big part in how quickly your site loads.
When I switched my own portfolio site to a more lightweight theme (GeneratePress), I was able to cut 48% off my page load times.
That ain’t chump change!
Performance-oriented themes should be:
- Lightweight in terms of file size and requests
- Modular so that you can pick and choose only the features that you want
So what are some good, performance-oriented themes?
All of these options are great, especially if you’re using a page builder like Elementor:
- Hello Theme – The team behind Elementor created this lightweight theme to pair with Elementor Pro (for Pro users only).
- GeneratePress – A popular lightweight theme from Tom Usborne.
- Genesis – A theme framework rather than a single theme. Popular with developers.
- Astra – Another lightweight, customizable theme with lots of integrations for plugins like WooCommerce and LifterLMS.
- OceanWP – Lightweight, customizable, and offers lots of helpful free and premium extensions.
3. WordPress Image Optimization (You Can Do This Automatically)
According to HTTP Archive, images comprise ~50% of the file size of an average page. Because images are such a big contributor to your page’s file size, you can get some similarly big performance improvements just by optimizing your images.
There are two main parts to optimizing the images that you use on your WordPress site.
First, there are the actual image dimensions. If your theme only displays images up to 800px wide (a pretty normal value), it doesn’t make any sense to upload full 3,000px+ images to your site (excluding hero images or photography sites and their like). Even on retina screens, that’s just a waste of space!
So step #1 is to resize the actual dimensions of the images on your site to a maximum width that fits your theme.
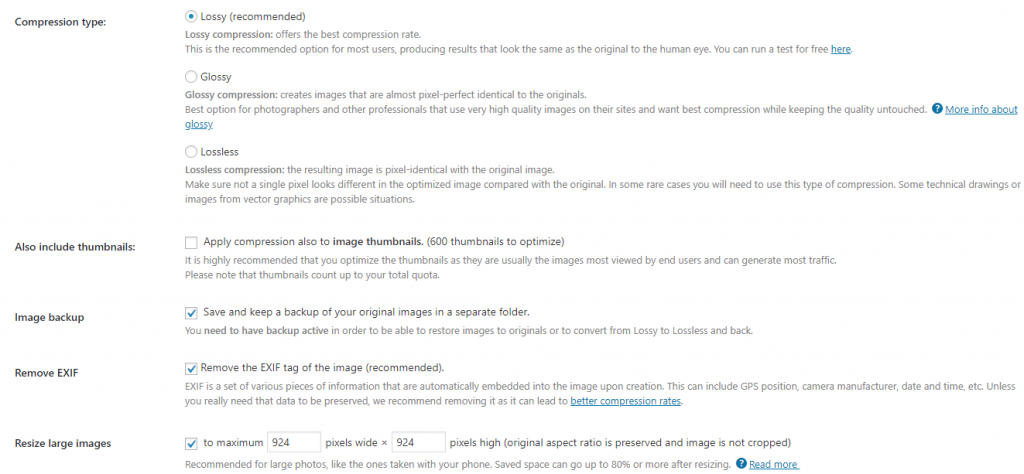
The next part of the puzzle is compression. Compression takes your already-resized images and shrinks them even more. There are two main types of compression:
- Lossy – big file size reductions, but also some loss in quality.
- Lossless – smaller size reductions, but also no loss in quality.
Depending on how important image quality is to your content, you can choose between the two methods of compression. Most sites can safely use lossy compression.
To both automatically resize and compress the images that you upload to your WordPress site, you have several quality plugin options:
- ShortPixel – bills you based on the number of images you optimize. No restrictions on size. Free for up to 100 images per month.
- Imagify – bills you based on how many MB you optimize. No restrictions on the number of images. Free for up to 25MB per month.
- Smush Image Compression and Optimization – 100% free but only for lossless compression. Free version also has a 1MB file size limit.
4. Get Rid Of Slow WordPress Plugins
Contrary to popular belief, there’s no direct correlation between the number of plugins on your site and your site’s speed.
That is, not all plugins negatively affect your site’s speed. But a lot do, so the general idea comes from the right place.
Rather than trying to arbitrarily remove plugins, though, you should specifically try to reduce the number of plugins that are actually slowing down your site.
Next question – how do you find the WordPress plugins that are slowing down your site?
Here are two fairly accessible ways to start:
First, you can use the free P3 (Plugin Performance Profiler) plugin if you’re still using PHP 5 (which again, you shouldn’t be doing. But if you haven’t switched your hosting yet, this plugin is the easiest place to start).
While it hasn’t been updated in a while, the plugin still works fine on most servers running PHP 5.
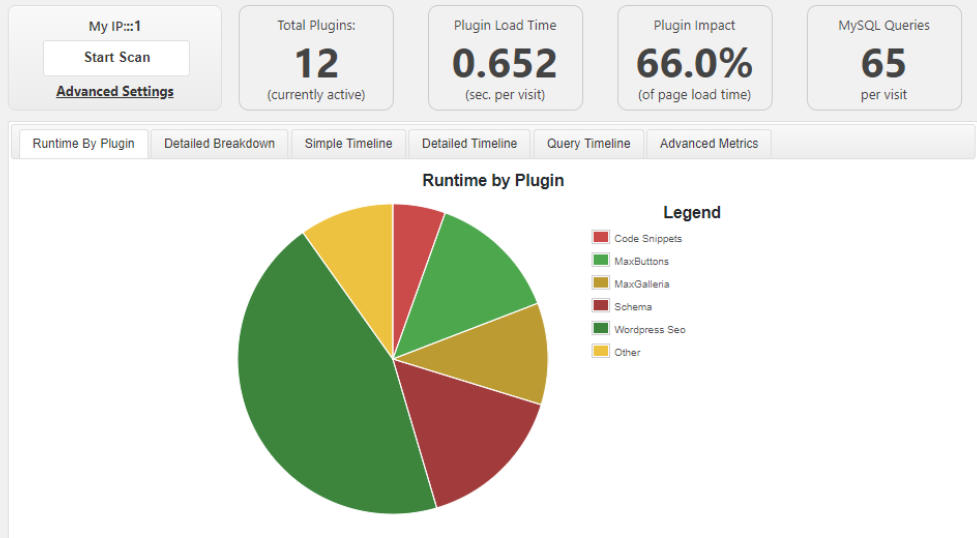
If your server is running PHP 7 (which again, is a good thing for performance – just not for using the P3 plugin), the next most user-friendly way to find slow plugins is via the Waterfall tab in a tool like GTmetrix or Pingdom Tools.
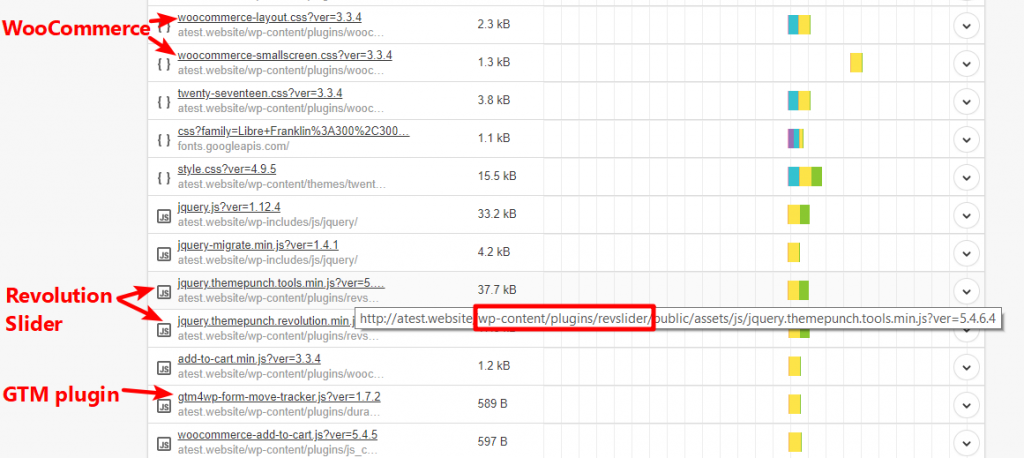
Just run your site through the tool and look at the various requests to find any bottlenecks. You can hover over a request and look at the URL to get a better idea of which plugin is the source of each request:
And finally, another good option, though one that’s not very accessible to casual users, is the free Query Monitor plugin.
So what can you do about plugins that slow down your site?
Well, the obvious answer is to remove them if they’re unnecessary, or find more performance-oriented alternatives.
Some plugins can help you kill two birds with one stone. For example, Elementor Pro can eliminate the need for a number of plugins because it offers built-in, performance-focused support for functionality like:
- Sliders
- Forms
- Social share buttons
- Countdown timers
- etc.
5. Minify Code And Concatenate Files
Minification and concatenation are two tactics to shrink the size and number of code files on your site without changing any of the underlying functionality.
Minification works by removing unnecessary characters (like white spaces and line breaks), while concatenation works by combining multiple files into one.
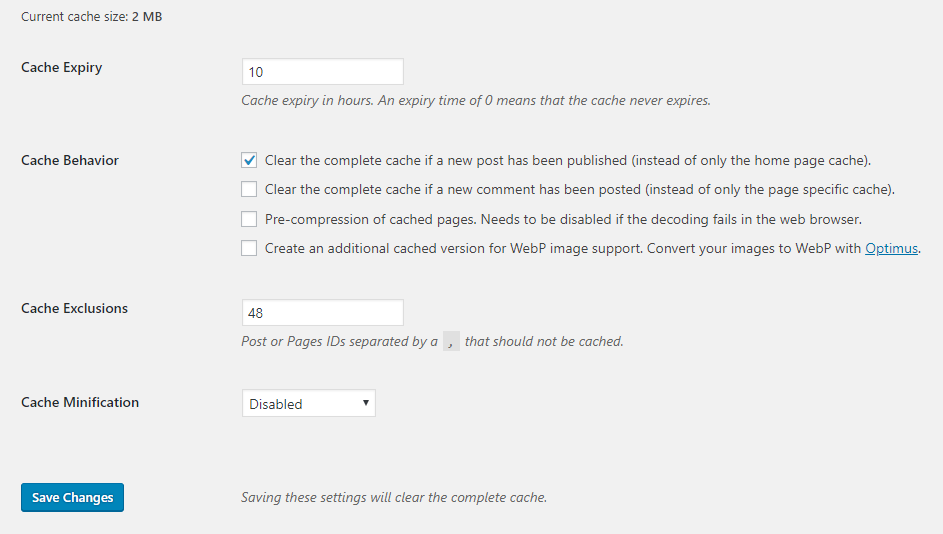
The free Autoptimize plugin can do both. All you need to do is configure it like this:
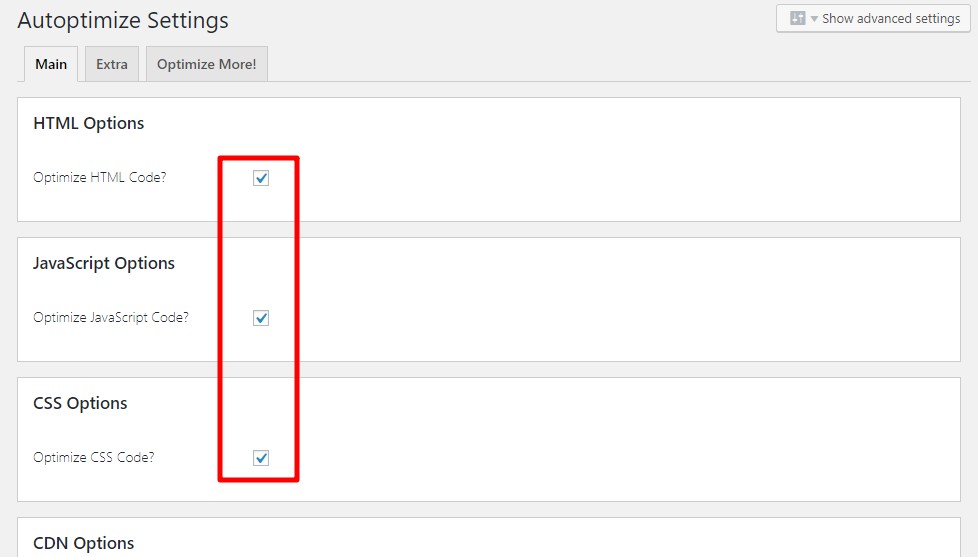
If you experience any issues with your site, a good troubleshooting step is to try turning off JavaScript optimization and see if that fixes the issue.
6. Use Page Caching To Generate Static HTML Versions Of Your Content
Page caching is the holy grail of posts about speeding up WordPress. And for good reason. Though it shouldn’t be used as a bandaid for underlying performance issues, this one little tweak can offer some major performance improvements.
Page caching works by creating a static HTML version of your page to serve up to visitors, rather than forcing your server to generate the page from your database and PHP files for every single visit.
Nowadays, many managed WordPress hosts implement page caching at the server level, so this might not actually be something that you need to do yourself if you’re already using managed WordPress hosting.
But if your host doesn’t implement page caching, you can do it via a plugin without too much fuss.
There are a bunch of great caching plugins out there, but some good options to get you started with are:
- Cache Enabler – a lightweight plugin from the KeyCDN folks. This one pairs great with Autoptimize (just make sure to disable Cache Enabler’s minification if you’re using Autoptimize).
- WP Super Cache – this free offering from Automattic has always performed well in my tests.
- Swift Performance Lite – this plugin has been getting rave reviews in the WordPress Speed Up Facebook group.
- WP Rocket – this one only comes in a premium version, but it can make a bunch of other performance tweaks that go beyond page caching (more on those in a second). And it can also help you integrate with Cloudflare. Speaking of…
7. Implement A Content Delivery Network (Like Cloudflare)
A content delivery network, or CDN for short, helps speed up your site for visitors around the world.
Here’s how:
Without a CDN, every single visitor, whether they’re in Paris, France or Paris, Texas, needs to download your site from the same location (your server).
A CDN changes that by storing copies of your site’s files at lots of different locations around the world. That way, visitors’ browsers can download your site from the location that’s closest to them, which results in lower latency and improved page load times.
It’s also surprisingly cheap (free!).
You can actually take advantage of a free CDN via Cloudflare. While Cloudflare does have paid plans (they’re not in the charity business), the free plan is totally fine for most websites.
To get your WordPress site set up with Cloudflare, you just need to:
- Sign up at Cloudflare
- Change your domain’s name servers to the nameservers provided by Cloudflare
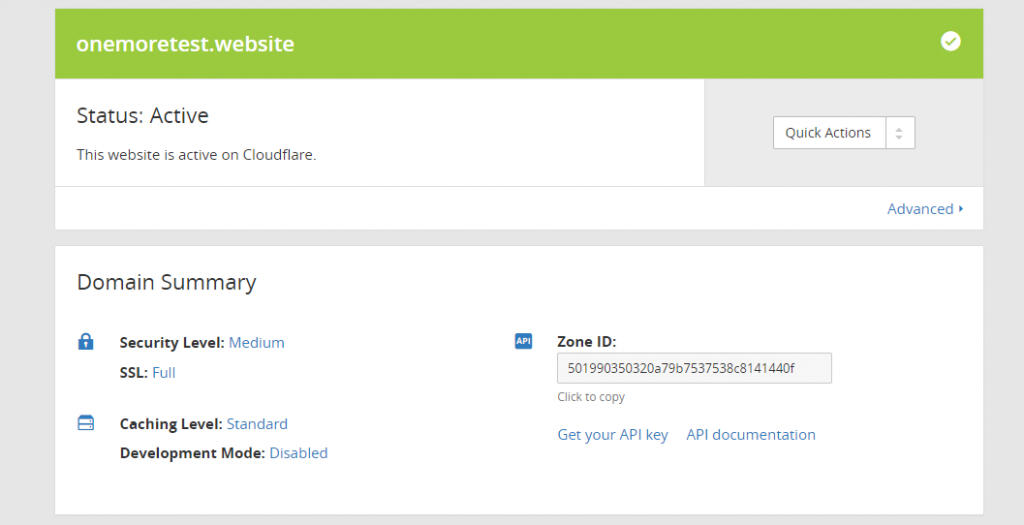
It’s pretty painless – but if you need some more help, this post has a more detailed guide, as well as some WordPress-specific configuration settings for Cloudflare.
6 More Smaller Performance Tweaks To Consider
These tweaks might not move the needle as much as the tips above, but they can still help you seek out some more performance improvements at your site.
If you don’t want to reinvent the wheel, some performance plugins can also implement many of these in one go. Notably:
- WP Rocket (premium)
- Swift Performance (freemium)
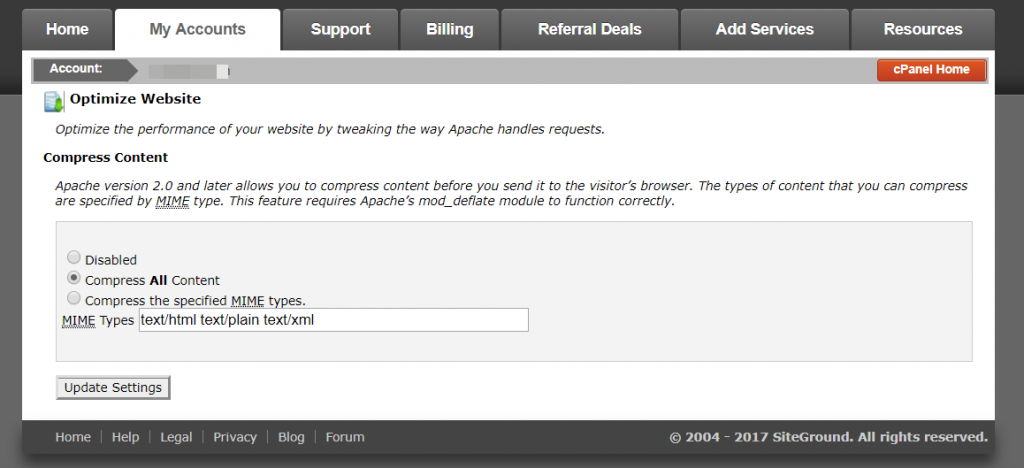
8. Activate GZIP Compression For A ~70% Reduction In File Size
GZIP Compression is a way to compress the files sent from your server to a visitor’s browser. This can shrink the size of your pages by ~70%, which is a pretty hefty improvement.
It’s also easy to implement. Assuming your server is using Apache (which is the case at most hosts), you just need to add this code snippet to your site’s .htaccess file:
# Compress HTML, CSS, JavaScript, Text, XML and fonts
AddOutputFilterByType DEFLATE application/javascript
AddOutputFilterByType DEFLATE application/rss+xml
AddOutputFilterByType DEFLATE application/vnd.ms-fontobject
AddOutputFilterByType DEFLATE application/x-font
AddOutputFilterByType DEFLATE application/x-font-opentype
AddOutputFilterByType DEFLATE application/x-font-otf
AddOutputFilterByType DEFLATE application/x-font-truetype
AddOutputFilterByType DEFLATE application/x-font-ttf
AddOutputFilterByType DEFLATE application/x-javascript
AddOutputFilterByType DEFLATE application/xhtml+xml
AddOutputFilterByType DEFLATE application/xml
AddOutputFilterByType DEFLATE font/opentype
AddOutputFilterByType DEFLATE font/otf
AddOutputFilterByType DEFLATE font/ttf
AddOutputFilterByType DEFLATE image/svg+xml
AddOutputFilterByType DEFLATE image/x-icon
AddOutputFilterByType DEFLATE text/css
AddOutputFilterByType DEFLATE text/html
AddOutputFilterByType DEFLATE text/javascript
AddOutputFilterByType DEFLATE text/plain
AddOutputFilterByType DEFLATE text/xml
# Remove browser bugs (only needed for really old browsers)
BrowserMatch ^Mozilla/4 gzip-only-text/html
BrowserMatch ^Mozilla/4\.0[678] no-gzip
BrowserMatch \bMSIE !no-gzip !gzip-only-text/html
Header append Vary User-Agent
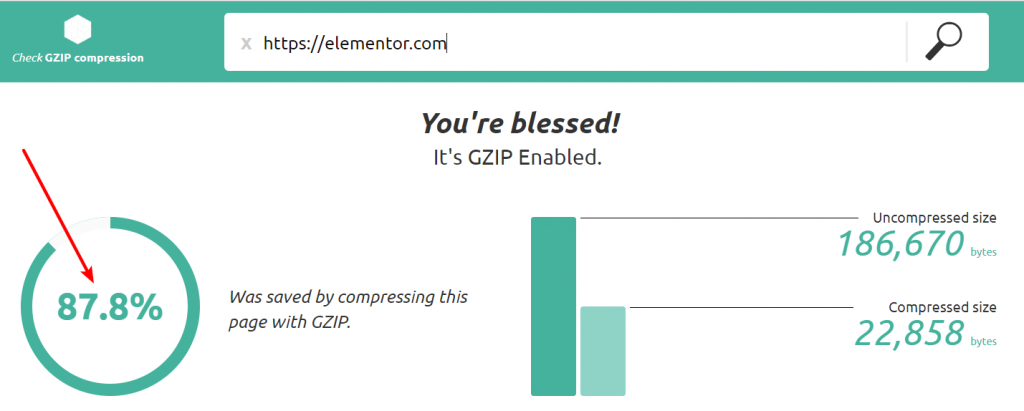
Once you’ve enabled GZIP compression, you can check that it’s working properly with the free Check GZIP compression tool.
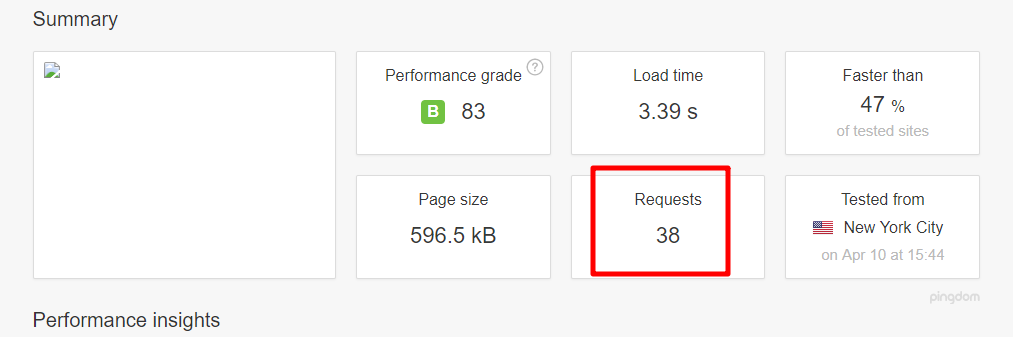
9. Reduce HTTP Requests on WordPress
Whenever someone lands on your site, their web browser “requests” (short for HTTP request) a list of files that are needed to “build” the page in your visitor’s browser. These requests include HTML, CSS, images, etc. And they even include external files and scripts, like your Google Analytics tracking code.
You saw an example of all these requests in the waterfall above (when you learned how to suss out slow plugins).
While each request can take different amounts of time, a good general rule is that more HTTP requests equals a slower website.
This is why tools like Pingdom and GTmetrix put the number of requests at your site front and center:
While some of the stuff that we’ve discussed – like using Autoptimize for concatenation – will help you reduce the number of requests at your WordPress site, you can also take things further with a more manual approach.
I don’t want to get too deep here because a full discussion takes a post of its own. But some quick wins for most WordPress sites are:
- Not using Google Fonts
- Disabling Font Awesome
- Turning off Gravatars
For example, to turn off Google Fonts and Font Awesome in your Elementor designs, you can add these two code snippets to a plugin like Code Snippets or your child theme:
add_filter( 'elementor/frontend/print_google_fonts', '__return_false' );
add_action( 'wp_enqueue_scripts', function() { wp_dequeue_style( 'font-awesome' ); }, 50 );
For a more detailed discussion of this topic, check out WP Rocket’s post.
10. Set Up Browser Caching
Browser caching is another type of caching that can speed up your site’s load times. Unlike the aforementioned page caching method, browser caching tells your visitors’ browsers to store certain types of files on each visitor’s local computer.
Then, the next time a visitor loads a page on your site, their browser can load the locally cached versions of certain files instead of the versions from your server. That means faster load times.
To enable browser caching manually, you just need to add another code snippet to your site’s .htaccess file:
<filesMatch ".(ico|pdf|flv|jpg|jpeg|png|gif|js|css|swf)$">
Header set Cache-Control "max-age=84600, public"
11. Optimize Your WordPress Database
Your site’s database is where all of your content and settings are stored. Over time, it will pick up a ton of trash in the form of:
- Post revisions
- Trashed posts/comments
- Etc.
While you’re unlikely to see a massive improvement in front-end page load times from simply cleaning your database, optimizing your database does ensure that your database runs more efficiently.
WP-Optimize can help you clean this junk out of your database. And then the plugin that I’ll talk about in the next section can help stop it from accumulating in the first place.
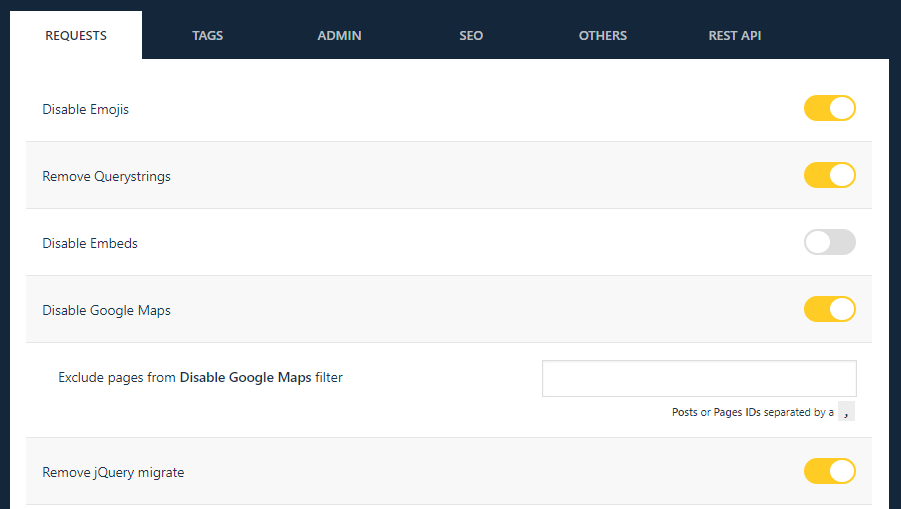
12. Use The WP-Disable Plugin
WP-Disable is a neat plugin that can help you make a number of even smaller performance tweaks from a user-friendly interface.
While you can play around with its settings, here’s what I usually like to do:
- Disable emojis. This is an extra .js file that WordPress adds. Unless you absolutely love emojis, you can safely get rid of it.
- Remove Query Strings. This is something that a lot of testing tools will ding you for.
- Change the Heartbeat API frequency to 60 seconds. This lessens the load on your server while still giving you the benefits of the Heartbeat API.
- Change Revisions to 1. While some people like to completely disable revisions, I find it helpful to still store at least one revision. It still lessens the load, while also giving you at least one revision in case something goes wrong with your current draft.
- Disable Google Maps embeds. If you absolutely need Google Maps, you can leave it on. But most sites can get by without direct Google Maps embeds. The plugin will let you exclude certain pages if you just need to use Google Maps on a specific page.
13. Disable Hotlinking To Stop Leechers
Hotlinking is when other people use images hosted on your server on their site. Because your server has to load images for someone else’s site, hotlinking can sap your server’s resources and use up your bandwidth.
Don’t let people take advantage of you. It’s easy to block hotlinking, just add this short code snippet to your site’s .htaccess file:
RewriteEngine on
RewriteCond %{HTTP_REFERER} !^$
RewriteCond %{HTTP_REFERER} !^http://(www\.)example.com/.*$ [NC]
RewriteRule \.(gif|jpg|jpeg|bmp|zip|rar|mp3|flv|swf|xml|php|png|css|pdf)$ - [F]
Make sure to replace example.com with your own domain name.
Elementor Gets You Part Of The Way There, These Tips Do The Rest
Elementor is built to never get in the way of your site’s performance. It:
- Follows code standards
- Uses external CSS files
- Generates small CSS files with custom CSS rules for each page
- Uses the “srcset” attribute for all image widgets
But all we can do is ensure that the content you build with Elementor loads as fast as possible. To ensure your entire site loads fast, you need to make sure everything else is optimized as well.
By following the tips in this guide, you should be able to do that.
Grab a fresh pot of coffee, spend an afternoon making these optimizations, and enjoy a faster, more streamlined WordPress site!
https://elementor.com/blog/speed-up-wordpress-website/