
WordPress post by email – do it safely and with flexibility
WordPress does include a basic Post via email setting that you can use by going to Settings → Writing, but I’m not going to cover that method in this article because it’s neither secure nor flexible by default. Here’s what I mean by those two terms:
- Security – it will post every single email sent to your private email address. As long as you keep this email private, you probably won’t run into issues. But if anyone got their hands on it, they could post to your blog just by sending emails to that address.
- Flexibility – it doesn’t give you any options for actually formatting your post content, which is a problem unless you just want to post plain text.
Instead, I’ll recommend two free plugins:
- Jetpack – this is the absolute easiest way to set up WordPress post by email. It’s also super flexible when it comes to formatting. The only downside is security – if anyone discovers the email address that Jetpack generates, they’ll be able to post to your blog.
- Postie – this plugin is a little bit more complicated to set up because you’ll have to create and configure your own Gmail account, but it gives you better security and still offers lots of formatting options.
So:
- If ease of setup is #1 to you, pick Jetpack.
- If security is #1 to you, pick Postie.
WordPress post by email with Jetpack
There are a lot of other reasons to use Jetpack, but among its many other features, it can also help you write a WordPress post by email.
To get started, you’ll need to install Jetpack and sync it to an existing WordPress.com account (or create a new WordPress.com account). You can use the free plan – no need to pay.
If you need help getting Jetpack installed, you can follow this guide:
Once you’ve got it working, here’s how to use the post by email functionality.
Step 1: Enable post by email functionality
Once you’ve installed Jetpack, go to Jetpack → Settings in your WordPress dashboard.
Scroll down to the bottom of the settings page and look for the Post by email box:
- Use the toggle button to turn the feature on
- Click the Create address button
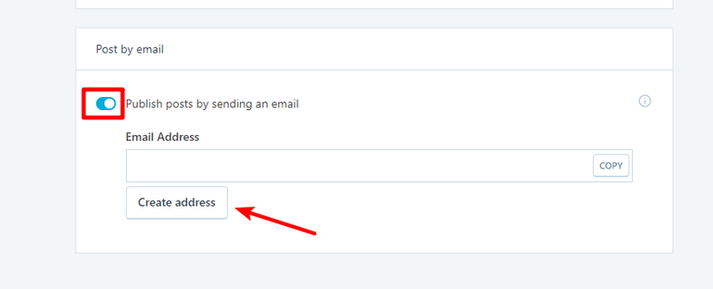
Jetpack will then generate an email address.
To write a WordPress post by email, you just need to send your email to this address:
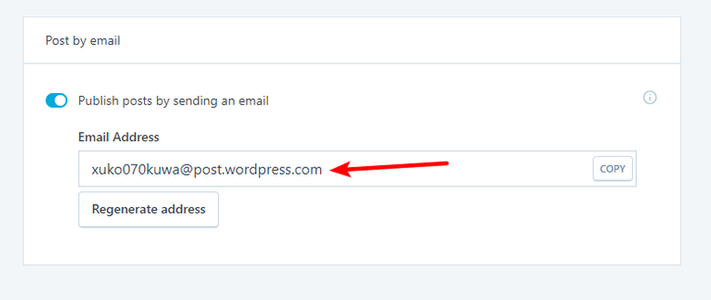
Keep this email private because anyone will be able to post to your blog by sending an email.
Step 2: Format your emails properly
One of the nice things about Jetpack is that it gives you tons of options for formatting your post content, including images, and controlling other information.
For example, you can use shortcodes to:
- Specify the category
- Set a publish time
- Title your post
- Automatically share your post to social media
You can learn more about how to format your emails in this help article.
WordPress post by email with Postie
Setting up Postie is a little bit more technical than Jetpack, but putting in that extra set up work will pay dividends because it only posts emails from registered email addresses, which makes it more secure.
To get started, install and activate the free Postie plugin:
Step 1: Create a new Gmail account for Postie
In order for Postie to work, you need to sync it with the email address that you’ll send your posts to.
The easiest way to do this is to create a free Gmail account (don’t use your existing Gmail account – you need to create a new one).
Once you get set up, you’ll send emails to this Gmail account to post them on your blog.
Go here to create a new Gmail account.
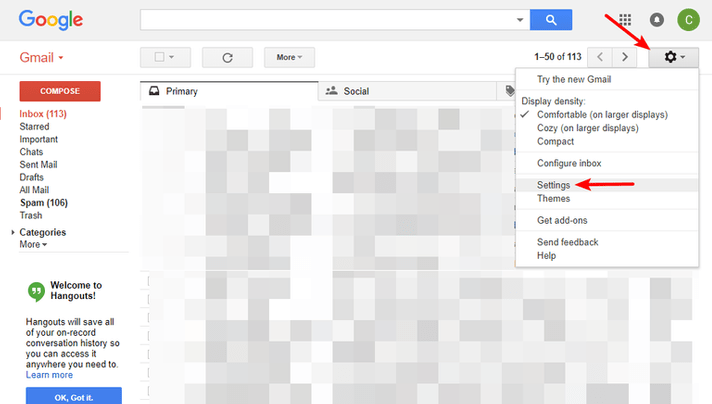
Once you have your new Gmail account, go to your Gmail dashboard and click on the Gear icon in the top-right corner. Then, choose Settings:
Go to the Forward and POP/IMAP tab and select the radio button to Enable IMAP:
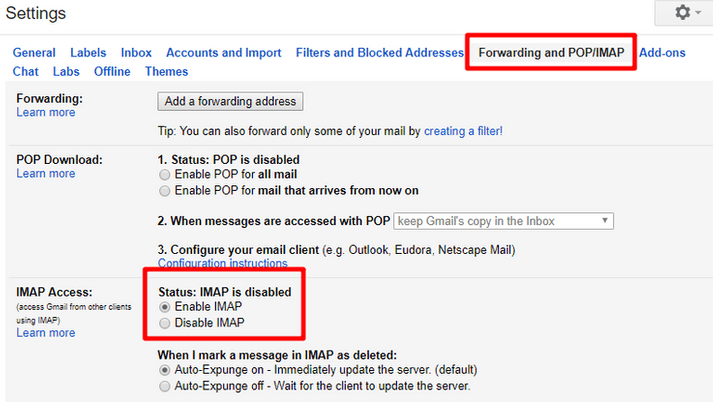
Make sure to click Save Changes at the bottom.
Now, you’re ready to configure the Postie interface in your WordPress dashboard.
Step 2: Configure email settings in Postie
To access the Postie settings, click on the Postie menu option in your WordPress dashboard.
Then, in the Mailserver tab, enter the following information:
- Connection – Sockets
- Mail Protocol – IMAP-SSL
- Port – 993
- Mail Server – imap.gmail.com
- Mail Userid – the Gmail email address that you just created
- Mail Password – the password for the Gmail address that you just created
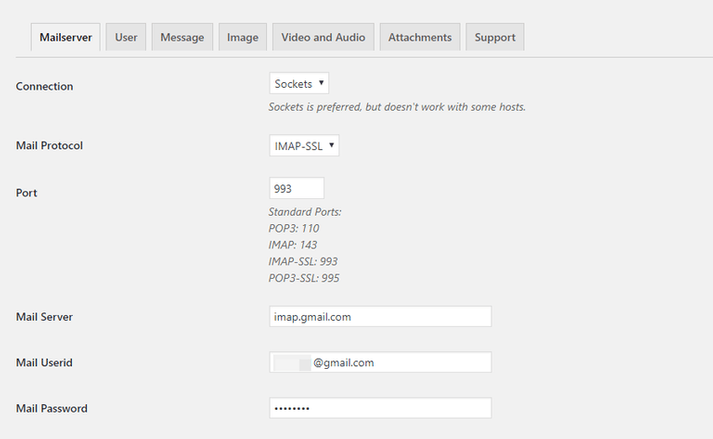
Once you’ve entered everything, make sure to click Save Changes.
Then, click the Test Config button on the right side to make sure everything is working:
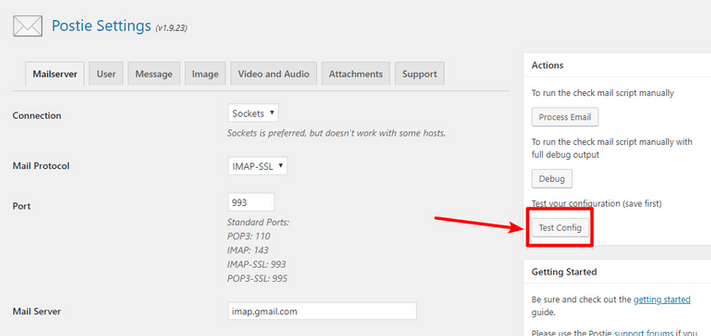
If all goes well, you should see a success message.
If you encounter an error, it’s probably because Google blocked the app (this happened to me). If that’s the case, Google will have sent you an email telling you what happened.
Open that email and click the option to Allow access to less secure apps:
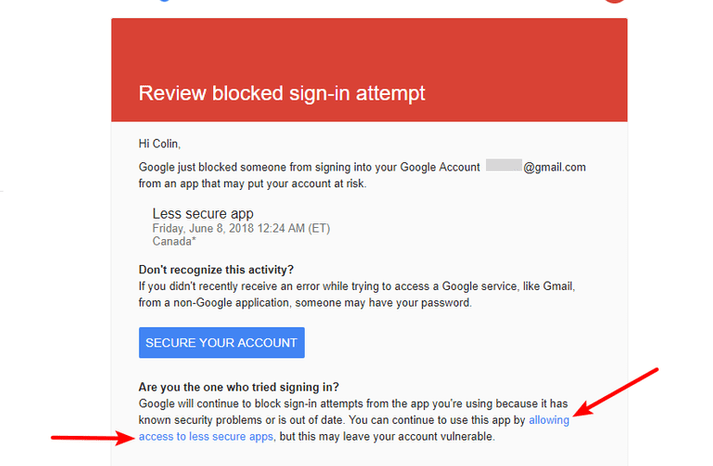
Now, you should be able to successfully connect without Google blocking Postie.
Step 3: Explore the other Postie settings
At this point, you’re all set up. But you should still explore the other Postie settings and configure them as needed. They affect both security, as well as how your imported emails are formatted.
For example, in the User tab, you can configure which emails are allowed to post to your blog, including authorized email addresses that might not already be registered at your site:
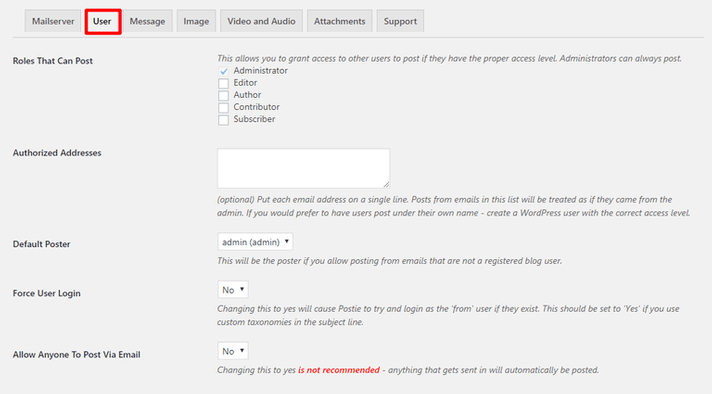
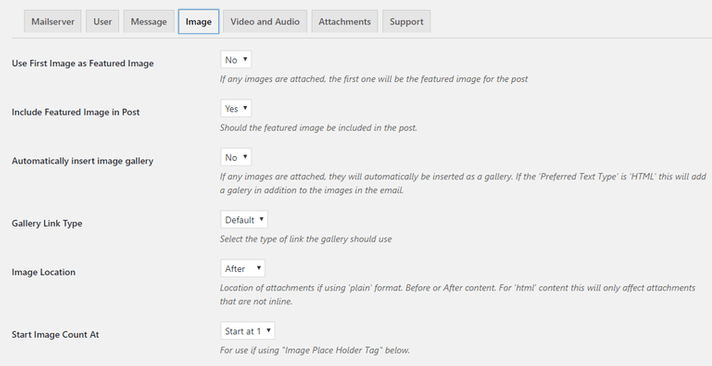
And in the Image tab, you can make Postie use the first image as the post’s featured image, as well as configure many other settings:
Step 4: Write your post
To write a WordPress post by email with Postie, you just need to send an email to the Gmail account that you created in Step 1.
Your email will be formatted according to the settings that you configured in the Postie interface.
Final thoughts on writing a WordPress post by email
There you have it! Two easy ways to write a WordPress post by email.
If you want the simplest method, you can use Jetpack – just remember to keep the email it generates secure.
And for better security, the Postie plugin restricts which incoming email addresses can post, though it does require a little bit more setup.


