• Home
    • English
    • 中文
  • About Us
  • Services
    • SEO Services
    • Website Design Service
  • Projects
  • Docs
  • Blog
    • Affiliate
    • Ecommerce
    • Frontend
    • linux
      • nginx
    • PHP
      • Magento
      • wordpress
    • Python
    • SEO
    • Web
  • Contact Us

Subscribe to Updates

Get the latest creative news from FooBar about art, design and business.

What's Hot

Design a plugin for wordpress woocommerce to display a tab to show attachment download

2024-04-06

TranslatePress v2.6.9 – WordPress Translation Plugin

2023-12-25

A Linux batch script converting pictures to webp format

2023-07-10
Facebook Twitter Instagram
  • 中文
  • English
Facebook Twitter Instagram Pinterest VKontakte
Weilai Tech Weilai Tech
  • Home
    • English
    • 中文
  • About Us
  • Services
    • SEO Services
    • Website Design Service
  • Projects
  • Docs
  • Blog
    • Affiliate
    • Ecommerce
    • Frontend
    • linux
      • nginx
    • PHP
      • Magento
      • wordpress
    • Python
    • SEO
    • Web
  • Contact Us
Weilai Tech Weilai Tech
Home»linux»Centos»Install: Quick Install Magento 2 on litespeed
Centos

Install: Quick Install Magento 2 on litespeed

OxfordBy Oxford2019-11-25No Comments2 Mins Read
Facebook Twitter Pinterest LinkedIn Tumblr Email
Share
Facebook Twitter LinkedIn Pinterest Email

Install: Quick Install Magento 2

After you install OpenLiteSpeed, follow the instructions below to get your Magento 2 site working.

You MUST enable Rewrites and “Auto Load from .htaccess” also. Magento 2 relies on .htaccess to work properly. Assuming your PHP, Script Handler, log and other options are already set, you can now save everything and reload OpenLiteSpeed by clicking on the Graceful Restart button.

Run the Magento Install Script

Step 1. Run Installation Script

Point your browser with default port to https://yourstore.com/
Accept terms and conditions by clicking ‘Accept and Setup Magento’.

Step 2. Readiness Check
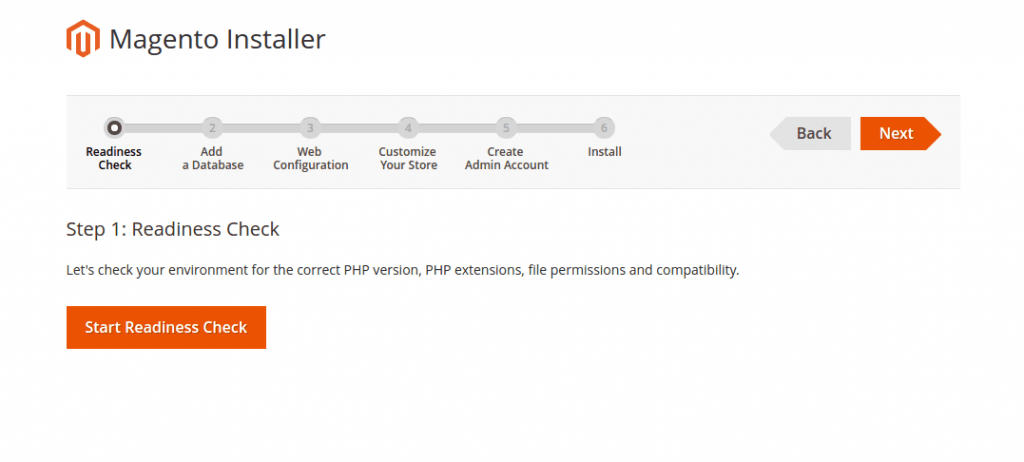
Magento CE installer needs to check if all the requirements are met. If you have followed all the guidelines above, all the requirements should be met, so just click ‘Start Readiness Check’.


Step 3. Set up Database

We’ve created the database above. Just enter the database details and click Save and continue. If the Magento installer is successfully able to connect to the database, it will start the installation process.

Enter the database details we created above.

Step 4. Web Configuration

Set up your Store and Admin URL Path, e.g.

  • Your Store Address: http://yourdomain.com/
  • Magento Admin Address: http://yourdomain.com/admin

Step 5. Create Admin Account

On this step, the installer will let you configure settings for your site. Example settings are:

  • Site name: Litespeedtech
  • Site email address: [email protected]
  • Username: litespeedtech
  • Password: litespeedtech

Step 6. Install

Good Practice: Change document root

  1. IMPORTANT NOTE: Magento 2 should never run on its root file structure on a production server like we just configured. After installing it, you must set its Document Root to /home/magento2/public_html/pub/, or else you can have a lot of problems with redirect loops, security, etc. No matter what file structure you are using, Magento Document Root must always point to “your-file-structure/pub” after installing.


  1. Setting the webroot to the pub/ directory prevents site visitors from accessing the Web Setup Wizard and other sensitive areas of the Magento file system from a browser.
    If you’re accustomed to using the Web Setup Wizard during development, be aware that you will not be able to access it when serving files from the pub/ dir.
  2. Please refer to this Magento 2 office document for doc root recommendation.
    1. Cannot use LiteMage on OLS

      Although the LiteMage cache plugin is free, it will require LiteSpeed Enterprise to make it work. Installing LiteMage on OLS won’t work.

Share. Facebook Twitter Pinterest LinkedIn Tumblr Email
Avatar photo
Oxford

Related Posts

A Linux batch script converting pictures to webp format

2023-07-10

how to install magento 2.3.1 on cyberpanel enterprise

2021-09-29

Keep Your SSH Session Running when You Disconnect

2020-11-25

centos push jekyll to github

2020-11-13
Recent Posts
  • Design a plugin for wordpress woocommerce to display a tab to show attachment download
  • TranslatePress v2.6.9 – WordPress Translation Plugin
  • A Linux batch script converting pictures to webp format
  • Hearing aid listed company official website SEO case
  • how to use docker to run php5.6 plus apache
November 2019
M T W T F S S
 123
45678910
11121314151617
18192021222324
252627282930  
« Oct   Dec »
Tags
app branding design digital Docly docs etc faq fix github Helpdesk Image issue magento Manual marketing memecached Photography planing seo sequrity tips Travel ui/ux web WordPress 爬虫
Editors Picks
About Us

Guangzhou Weilai Technology is a foreign trade integrated marketing service provider focusing on Google as the drainage center and marketing self-built website as the carrier.

Email Us: [email protected]
Contact: +86 18676917505

Facebook Pinterest YouTube LinkedIn
Recent Posts
  • Design a plugin for wordpress woocommerce to display a tab to show attachment download
  • TranslatePress v2.6.9 – WordPress Translation Plugin
  • A Linux batch script converting pictures to webp format
  • Hearing aid listed company official website SEO case
  • how to use docker to run php5.6 plus apache
From Flickr
Website Design Case
© 2024 Copyright by Guangzhou Weilai Technology Co.,Ltd..
  • Home
  • About Us
  • SEO Services
  • Website Design Service
  • Projects
  • Blog
  • Contact Us

Type above and press Enter to search. Press Esc to cancel.